

Among my most useful and most frequently used assistants (CustomGPTs inside ChatGPT) is my personal “MichalGPT“. What can it do? Alongside the classic functions such as having a conversation (through the voice module in the mobile app), summarising the conversation and pulling out its key ideas and tasks, there is the feature I value most of all: it can send the summary and the complete transcript of that exchange to my e-mail. At a time when there is no sensible way to search through your ChatGPT conversation history, that is an invaluable trick.
When I use MichalGPT most often
- When something comes to mind somewhere I have no way of writing it down (in the car, out for a walk, in the evening before sleep…)
- MichalGPT lets me capture any thought or task the instant it occurs to me. I just say or type into ChatGPT what is on my mind, and at the end I can have it sent to my e-mail so that nothing gets forgotten.
- When I am leaving or driving away from a meeting:
- Once a meeting is over I run through with MichalGPT what the other side and I agreed on, what we promised each other and what the next steps are. That gives me a clear overview and a summary in my inbox that I can come back to at any time.
- When I need a record of how an important meeting or brainstorm went:
- During the session or afterwards I can quickly summarise the main points, ideas and conclusions. MichalGPT again sends them to my e-mail at the end, which makes processing them much easier.
- When I am working on several projects at once and need to keep track:
- MichalGPT helps me structure my thoughts and tasks across different projects. It can send me a clear summary of every conversation, so I never lose sight of what needs doing and which deadlines are coming up.
- When planning and preparing for meetings:
- Before an important meeting I can go through the key points I want to cover with MichalGPT and then have them sent to my e-mail, so that I have all the information to hand when the meeting starts.
MichalGPT is not only a reliable helper for me, but also a tool that keeps me organised and efficient. Being able to reach the transcripts and summaries of conversations at any moment is priceless.
In this detailed guide I will show you how easily you can build a similar assistant of your own. Here is what you will need:
1. A paid OpenAI ChatGPT account, and with it access to your own CustomGPTs
- What is it? A CustomGPT is an extension of ChatGPT that lets you build personalised assistants around your own specific needs.
- How do you get it? All you need is an OpenAI account and access to the paid version of ChatGPT, which includes the ability to create and manage your own CustomGPT models.
2. A SendGrid account
- What is it? SendGrid is a service that lets you send e-mails through an API from your application or service via its SMTP servers, simply and efficiently.
- How do you get it? Register at SendGrid and create an account. SendGrid offers various account tiers, including a free one that will comfortably cover ordinary use.
Let us assume you already have the paid ChatGPT account. And also that you either have some basic experience with CustomGPTs or can set one up following this detailed guide.
Step 1: Register with SendGrid and get an API key for sending mail
Creating the account and getting the API key
Creating a SendGrid account
- Visit SendGrid and create an account.
Getting the API key
- Log in to your SendGrid account.
- Go to Settings -> API Keys.
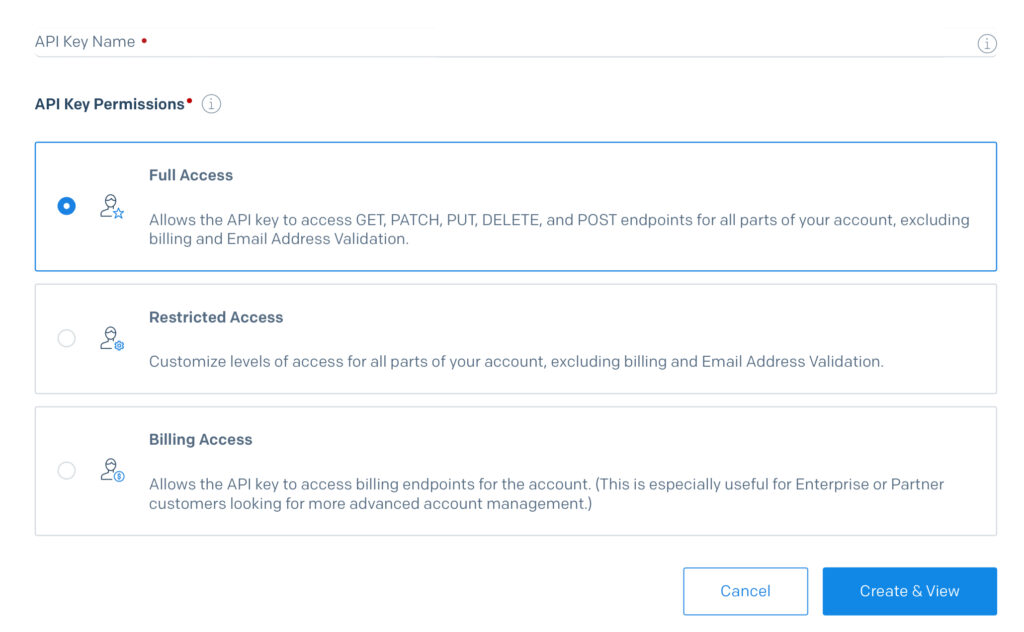
- Click Create API Key, give it a name and set the permissions you need.
- When you create the API key in SendGrid, make sure it has the right permissions. For sending e-mail it is enough for the key to hold the Mail Send permission. If the key does not have the right permissions, your requests will be rejected even when authentication is set up correctly.
- Copy the API key and store it somewhere safe.
Sender validation
- SendGrid requires validation of the e-mail address or the domain the messages will be sent from.
- Go to the Sender Authentication section and choose between validating a single e-mail address or a whole domain.
- Follow the verification instructions.
Step 2: Setting up the CustomGPT action
Now we move on to creating the action that will make it possible to send e-mail through SendGrid. Your action will be set up so that on the command “End” it generates an e-mail and sends it to the address you specify.
Action specification
openapi: 3.1.0
info:
  title: SendGrid Email Sender
  description: API for sending e-mails through SendGrid.
  version: 1.0.0
servers:
  - url: https://api.sendgrid.com/v3
paths:
  /mail/send:
    post:
      operationId: sendEmail
      summary: Send an e-mail
      x-openai-isConsequential: false
      requestBody:
        required: true
        content:
          application/json:
            schema:
              type: object
              properties:
                personalizations:
                  type: array
                  items:
                    type: object
                    properties:
                      to:
                        type: array
                        items:
                          type: object
                          properties:
                            email:
                              type: string
                          required:
                            - email
                  required:
                    - to
                from:
                  type: object
                  properties:
                    email:
                      type: string
                  required:
                    - email
                subject:
                  type: string
                content:
                  type: array
                  items:
                    type: object
                    properties:
                      type:
                        type: string
                      value:
                        type: string
                  required:
                    - type
                    - value
      responses:
        "202":
          description: The e-mail was sent successfully
        "400":
          description: Error while sending the e-mail
components:
  securitySchemes:
    bearerAuth:
      type: http
      scheme: bearer
      bearerFormat: JWT
  schemas: {}
security:
  - bearerAuth: []
Step 3: Entering the API key
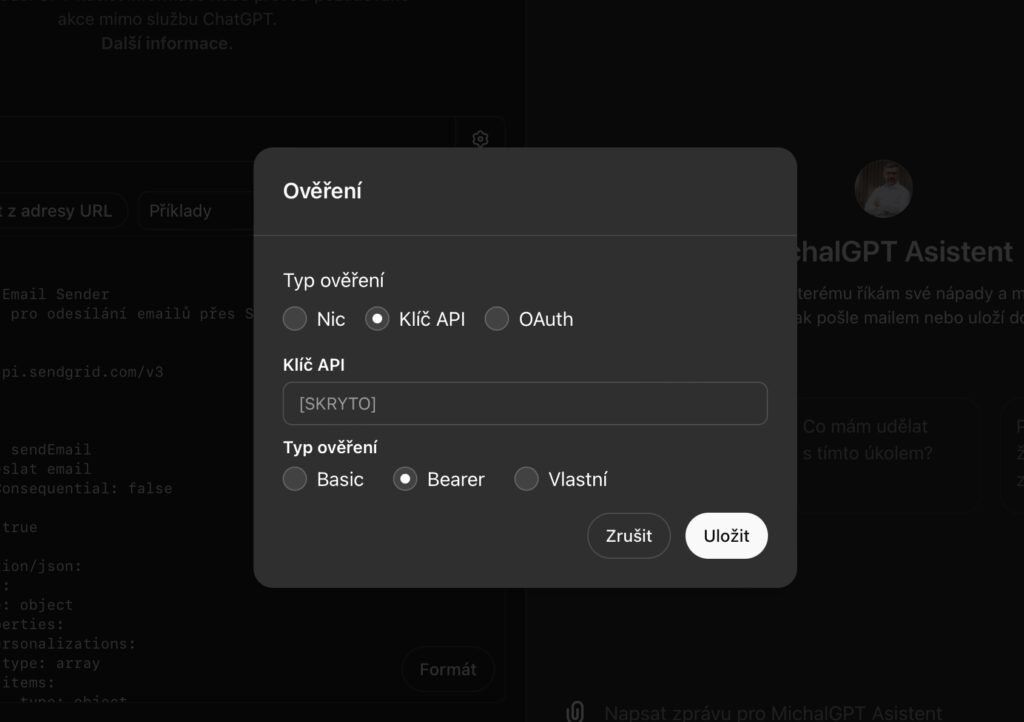
When creating the action in your CustomGPT, do not forget to paste the API key into the authentication field. In the authentication settings choose the Bearer option and paste in the API key you generated in SendGrid.
Step 4: Writing the system prompt
The system prompt defines how your assistant reacts to commands and when it sends the e-mail.
An example system prompt:
I am Michal's personal assistant, helping him capture ideas, notes and tasks in English. My main job is to listen to Michal, write down his thoughts and tasks, and provide advice or background material when asked. All my replies will be in English. I will be to the point and try to be useful. When Michal types 'End', I will produce a summary of the conversation so far and a list of tasks grouped by priority. I will then send that information to the e-mail address [email protected] using the 'sendEmail' action. The subject line will be in the form: 'MailGPT: Name of the conversation'. The mail will be formatted in HTML:
- A header with the name of the conversation
- A summary of the tasks by priority
- The full transcript of the conversation at the end
Step 5: Testing
Once everything is set up, test it thoroughly. Make sure the assistant generates the e-mails correctly and sends them to the address you gave it. Try different scenarios and check that all the information you want is included and formatted properly in the message. The prompt above is only a starting point. Experiment with different variants.
Integrating SendGrid with CustomGPT actions opens up new possibilities for automating e-mail communication inside your applications. Following this guide you can easily set up and implement an e-mail sending function that saves you time and makes you more efficient. This way you can tailor an AI assistant precisely to your own needs.


